Bear in mind I am not a professional crochet artist nor am I very experienced in writing patterns for others. What makes sense to me may not make sense to someone else so let me know if you have any queries.

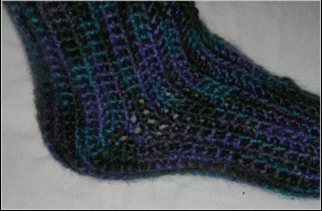
This is the yarn I used, a basic yarn from a discount store. I have idea what to call it but I hope it helps :P

the cuff says:
10x10cm = 18 rows and 13 stitches. 7mm/2 UK needles
Crochet pattern – intermediate
Yarn – open to suggestion, the first row you crochet goes from the top of the sock to just before the toes so add or subtract stitches accordingly
Starting on one side of the laces

1. ch 59. sc in 1st st from hook. Sc to end, ch 1 and turn
2. repeat (1.) for another 7 rows
Heel shaping, side 1
3. sc in the next 16 sts. 2 sc in the next st. sc to end, ch 1 and turn
4. sc in the next 41 sts. 2 sc in each of the next 2 sts, 16 sc to end. Ch 1 and turn
5. sc in the next 16 sts. 2 sc in each of the next 4 sts, 41 sc to end. Ch 1 and turn
6. sc in the next 43 sts. 2 sc in each of the next 4 sts, 18 sc to end. Ch 1 and turn
7. sc to end, ch 1 and turn
8. repeat (7.) for another 4 rows
Calf shaping
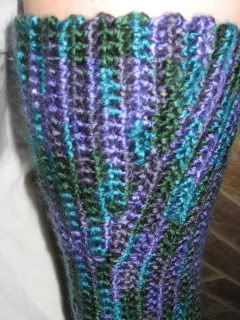
9. sc in the next 5 sts. 1 sl st, ch 1 and turn. 5 sc to end, ch 1 and turn
10. sc in the next 10 sts. 1 sl st, ch 1 and turn. 10 sc to end, ch 1 and turn
11. sc in the next 15 sts. 1 sl st, ch 1 and turn. 15 sc to end, ch 1 and turn
12. sc in the next 20 sts. 1 sl st, ch 1 and turn. 20 sc to end, ch 1 and turn
13. (should be 69) sc to end, ch 1 and turn
14. sc to end, ch 1 and turn
15. sc in the next 20 sts. 1 sl st, ch 1 and turn. 20 sc to end, ch 1 and turn
16. sc in the next 15 sts. 1 sl st, ch 1 and turn. 15 sc to end, ch 1 and turn
17. sc in the next 10 sts. 1 sl st, ch 1 and turn. 10 sc to end, ch 1 and turn
18. sc in the next 5 sts. 1 sl st, ch 1 and turn. 5 sc to end, ch 1 and turn
19. sc to end, ch 1 and turn
20. repeat (19.) for another 4 rows
Heel shaping, side 2
21. sc in the next 18 sts. St 2 tog to decrease (repeat another 3 times). 43 sc to end, ch 1 and turn
22. sc in the next 41 sts. St 2 tog to decrease (repeat another 3 times). 16 sc to end, ch 1 and turn
23. sc in the next 16 sts. St 2 tog to decrease (repeat another 3 times). 41 sc to end, ch 1 and turn
24. sc in the next 41 sts. St 2 tog to decrease (repeat another 3 times). 16 sc to end, ch 1 and turn
25. sc to end, ch 1 and turn
26. repeat (25.) for another 7 rows
27. finish off
Toe

Step 1
The toe is kind of improvised, so bear with me
1. hold the two sides of the sock together and slip stitch to join them
2. sc all the way around the edge and join to the beginning of the row
3. sc to to the side, decrease by crocheting 2 stitches together (repeat) and sc across the back and decrease again on the other side
4. sc to the centre and join
5. repeat (2. & 3.) until the toe is a comfortable length, and stitch the remaining opening closed
Tips
- For a wider gap between the laces (to show off lacing better) do fewer rows at 26. & 2.
- For smaller calves, skip steps 9. & 18.
- For longer or shorter socks, chain more or less at 1.– this will throw out the pattern slightly, but use your imagination ;P
- This size will fit a few different sized feet, the crochet stretches quite well so once you have sorted out the correct yarn, the pattern will fit most ladies’ adult feet
- Any hole will be suitable for the laces. To make more of a feature of them, choose holes about an inch or so in from the edge of the sock
- One side of the lacing will look a bit longer than the other, but will have the same amount of stitches. This is because one side began as a chain. Just tug the sides a little and lace them up and they will become even.
- Have fun and try some fancy stitching too. Some lace work on the top would be great and even trying to put the lacing on the back would be cool too.
- Normal disclaimer: Please do not use my tutorial without my permission or copy my design style for profit. Make as many of these socks for yourself and friends but please do not make them to sell or sell the tutorial. You know, crafty karma and all that.
No comments:
Post a Comment